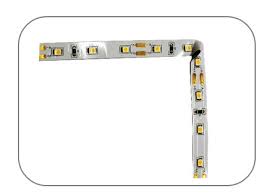


How To 90 Degree Led Strip, LED strip lights are a popular choice for adding ambiance and lighting to various spaces, from homes to offices. However, achieving clean, professional-looking corners can be challenging. In this article, we’ll guide you through the process of creating a 90-degree angle with LED strip lights, ensuring a seamless and visually appealing installation.
What You’ll Need
Before you begin, gather the following materials:
- LED Strip Lights: Choose the type and color of LED strips you prefer.
- LED Strip Connectors: These connectors help join two strips at an angle.
- Cutting Tool: A pair of scissors or a sharp knife for cutting the strips.
- Ruler or Measuring Tape: For accurate measurements.
- Double-Sided Tape or Mounting Clips: For securing the strips to surfaces.
- Soldering Kit (Optional): For a more permanent connection if you prefer soldering over using connectors.
- Power Supply: Ensure you have the appropriate power supply for your LED strips.
Step-by-Step Instructions
1. Measure and Plan
- Determine Your Layout: Before cutting, plan where you want your LED strips to go. Measure the length needed for each side of the 90-degree corner.
- Mark the Cutting Points: Use a ruler to mark the points where you’ll cut the strips. Ensure these marks align with the designated cut lines on the LED strips.
2. Cut the LED Strips
- Cut Along the Designated Lines: Using your scissors or cutting tool, cut the LED strip at the marked points. Make sure to cut only where indicated to avoid damaging the strips.
3. Prepare for the 90-Degree Angle
- Use Connectors: If you’re using LED strip connectors, attach one end of the connector to each side of the cut strips. These connectors allow for easy bending at the corner without damaging the LED strips.
4. Install the Strips
- Peel Off the Backing: Most LED strips come with an adhesive backing. Carefully peel off the backing from the tape on the back of the strips.
- Position the Strips: Start by securing the first strip along one wall or surface. Gently press it down to ensure it adheres well.
- Attach the Second Strip: Bring the second strip around the corner. If you’re using connectors, make sure they fit snugly into place.
5. Secure the Installation
- Use Mounting Clips: For added stability, consider using mounting clips along the length of the LED strips to prevent them from peeling off over time.
- Check for Proper Alignment: Ensure both strips are aligned and that the light appears consistent at the corner. Adjust as needed.
6. Connect to Power
- Connect the Power Supply: Once both strips are installed, connect them to your power supply. Make sure everything is securely connected and that the power supply is compatible with your LED strips.
7. Test the Lights
- Turn On the Power: Switch on the lights to test the installation. Check that both sides of the strip light up evenly and that the transition at the 90-degree corner is seamless.
8. Finishing Touches
- Adjust Brightness and Color (if applicable): If your LED strips have adjustable brightness or color settings, take a moment to set them to your desired preferences.
Tips for a Clean Installation
- Use Corner Connectors: If available, consider using corner connectors designed specifically for LED strips. These can simplify the process and improve the look of your installation.
- Plan Your Power Supply Location: Ensure that the power supply is easily accessible for future adjustments or replacements.
- Clean the Surface: Before installing the strips, clean the surface to ensure the adhesive sticks properly.
Conclusion
Creating a 90-degree angle with LED strip lights doesn’t have to be complicated. With careful planning, the right tools, and a little patience, you can achieve a professional-looking installation that enhances your space. Whether you’re lighting up a room, adding ambiance to an outdoor area, or creating accent lighting, these tips will help you get the job done right. Enjoy your new lighting setup!
