

Zen Garden How To, Zen gardens, also known as Japanese rock gardens or karesansui, offer a tranquil space for meditation and reflection. These minimalist landscapes typically feature gravel, rocks, and carefully placed plants, allowing for a serene environment that encourages mindfulness. Here’s a guide on how to create your own Zen garden.
Step 1: Choose the Location
- Select a Quiet Spot: Look for an area in your yard or balcony that feels peaceful. Ideally, it should be away from noise and distractions.
- Consider Sunlight: Zen gardens can be placed in sunny or shaded areas, depending on the plants you plan to include.
Step 2: Plan Your Design
- Sketch Your Layout: Before starting, draw a simple plan for your garden. Consider including elements like gravel, rocks, sand, and plants.
- Balance and Simplicity: Aim for a harmonious balance. Use asymmetry to create a more natural look, avoiding overly structured designs.
Step 3: Gather Materials
- Gravel or Sand: Fine gravel or sand is used to represent water. Choose a light color for a more serene look.
- Rocks: Select various sizes of rocks to symbolize mountains or islands. Smooth stones work well for contrast.
- Plants: Choose low-maintenance plants, such as succulents, moss, or Japanese maples.
- Rakes and Tools: A small rake is essential for creating patterns in the gravel or sand. You may also need shovels and gloves.
Step 4: Prepare the Ground
- Clear the Area: Remove any weeds, grass, or debris from the chosen spot.
- Level the Ground: Ensure the ground is even, as this will create a stable base for your garden.
Step 5: Lay Down the Base
- Add a Barrier: If necessary, use landscaping fabric to prevent weeds from growing through your gravel.
- Spread Gravel or Sand: Pour a layer of gravel or sand, about 2-3 inches deep. Use a rake to level it out evenly.
Step 6: Arrange the Rocks
- Place Larger Rocks First: Start with your largest stones, positioning them in a way that feels natural. They can be grouped or placed individually.
- Add Smaller Rocks: Fill in with smaller stones, creating visual interest and texture.
Step 7: Incorporate Plants
- Select Plant Locations: Choose areas for your plants, keeping in mind their growth patterns and sunlight needs.
- Plant Carefully: Dig small holes and plant your selections. Be sure to space them appropriately for future growth.
Step 8: Create Patterns
- Rake Designs into the Gravel: Use your rake to create patterns that mimic ripples or waves, symbolizing water. This is a meditative process—take your time to find a design that feels right.
Step 9: Add Finishing Touches
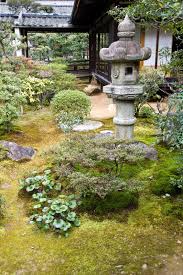
- Consider Additional Elements: You might want to add lanterns, benches, or water features for added tranquility.
- Maintain Simplicity: Remember that less is more in a Zen garden. Avoid cluttering the space with too many items.
Step 10: Enjoy Your Zen Garden
- Find Time for Reflection: Use your garden as a space for meditation, mindfulness, or simply enjoying nature.
- Maintain Regularly: Keep your garden tidy by raking the gravel regularly and trimming plants as needed.
Conclusion
Creating a Zen garden is a rewarding project that can enhance your outdoor space while providing a peaceful retreat. By following these steps, you can design a serene landscape that fosters relaxation and mindfulness. Enjoy the process and embrace the tranquility that your new Zen garden will bring!
